---
title: Entering Trip Inspections / DVIRs
description: Entering inspection or defect or DVIR information, circle check
---
[Skip to content](https://knowledge.brightorder.com/entering-trip-inspections-/-dvirs#main-content)
English
Show submenu for translations
[More support](https://knowledge.brightorder.com/kb-tickets/new?hsLang=en) [Customer portal](https://help.brightorder.com/tickets?hsLang=en)
[](https://knowledge.brightorder.com?hsLang=en)
Open main navigation
Close main navigation
- English
Show submenu for translations
- [More support](https://knowledge.brightorder.com/kb-tickets/new)
- [Customer portal](https://help.brightorder.com/tickets)
- Go to www.brightorder.com
Go to www.brightorder.com
How can we help you?
- There are no suggestions because the search field is empty.
1. [BrightOrder Knowledge Base](https://knowledge.brightorder.com/?hsLang=en)
2. [emdecs one ELD](https://knowledge.brightorder.com/emdecs-one-eld?hsLang=en)
3. [How-To Guides](https://knowledge.brightorder.com/emdecs-one-eld?hsLang=en#how-to-guides)
# Entering Trip Inspections / DVIRs
You can create compliance Trip Inspections & Digital Vehicle Inspection Records in **emdecs one ELD**.
You can complete a Trip Inspection through the On-Duty Status Change, or manually create one in the Trip Inspection Page.
### **Method 1: Starting an inspection from the Driver Screen**
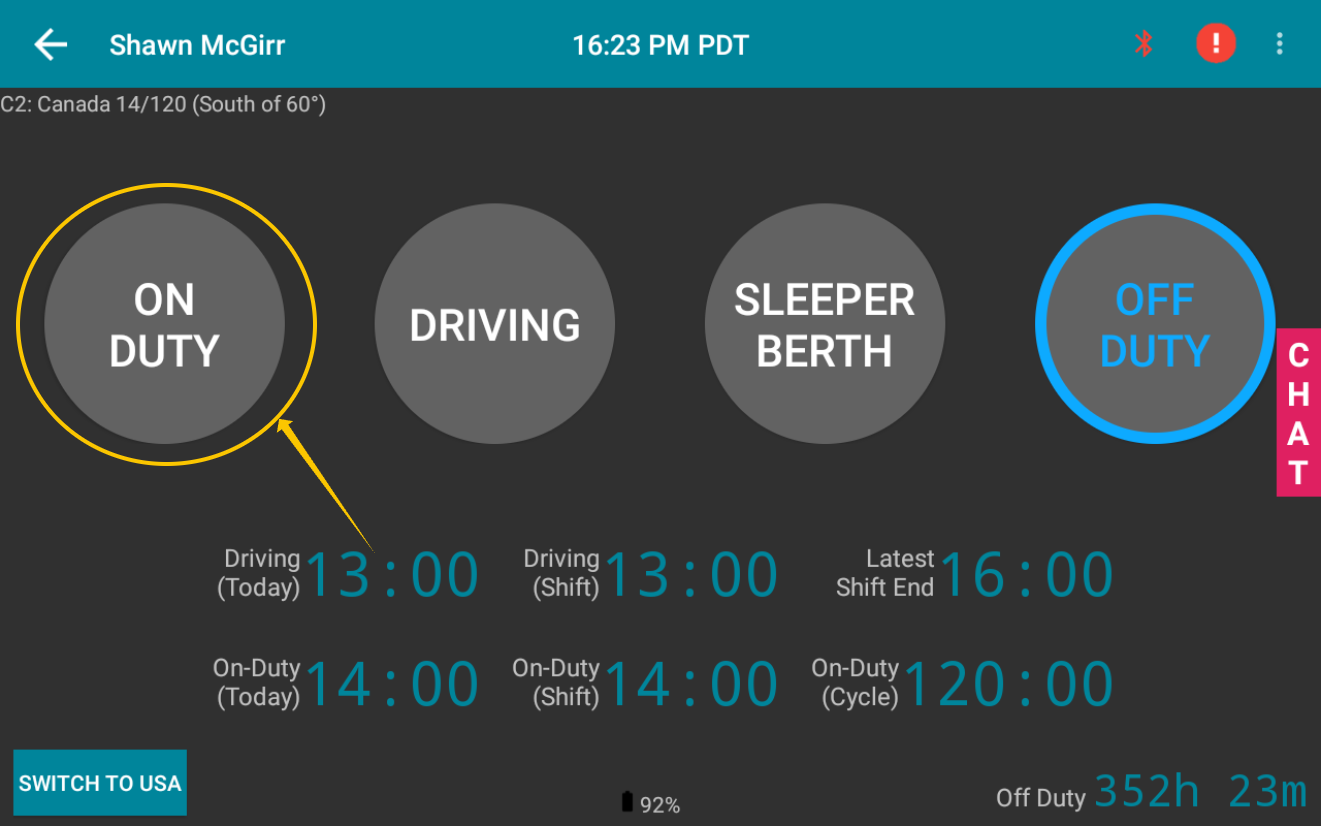
From the Driver Screen, select **On-Duty**.
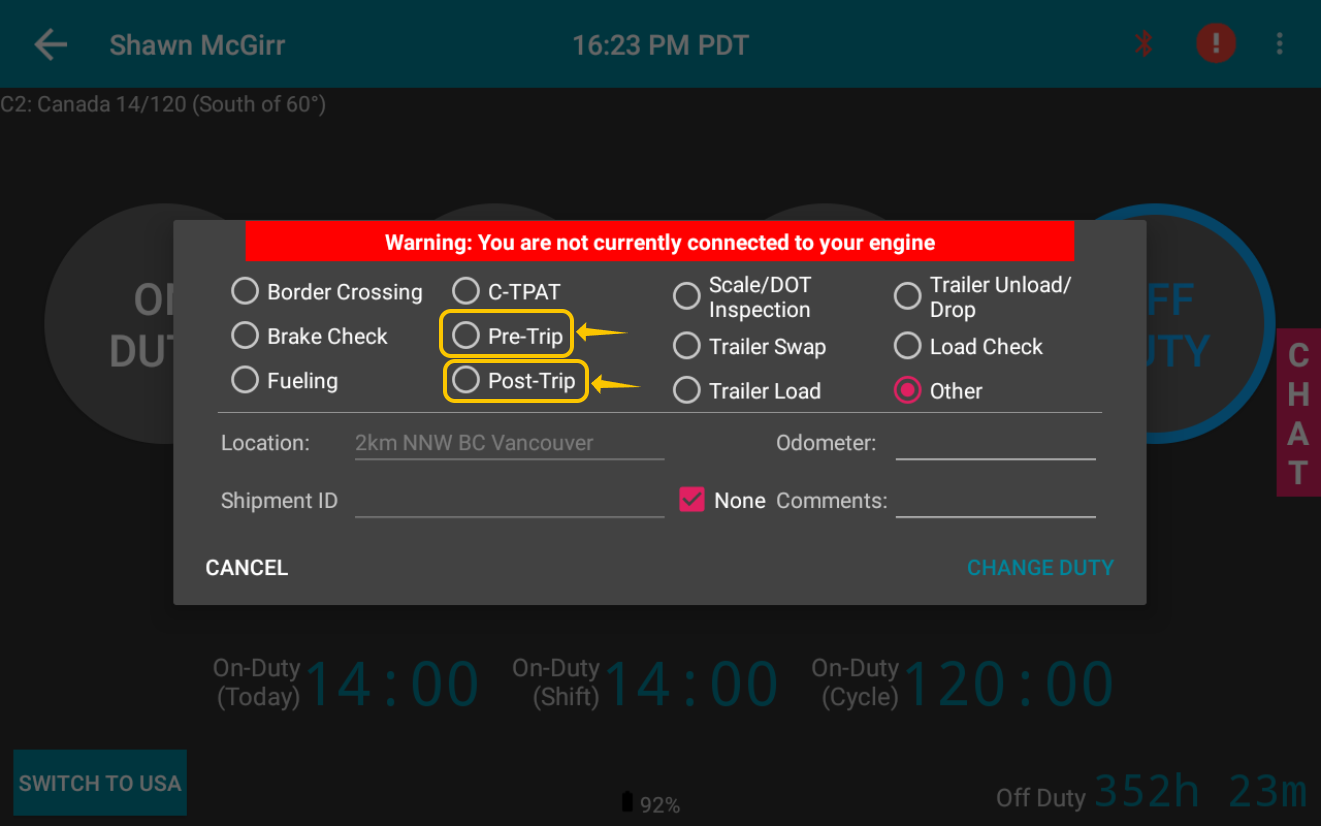
When **On-Duty** is selected, a list of annotations can be selected for the duty status change. Select **Pre-Trip** or **Post-Trip**. When those annotations are selected, then the Trip Inspection Screen will pop up.
### **Method 2: Starting an inspection from the Trip Inspection Screen**
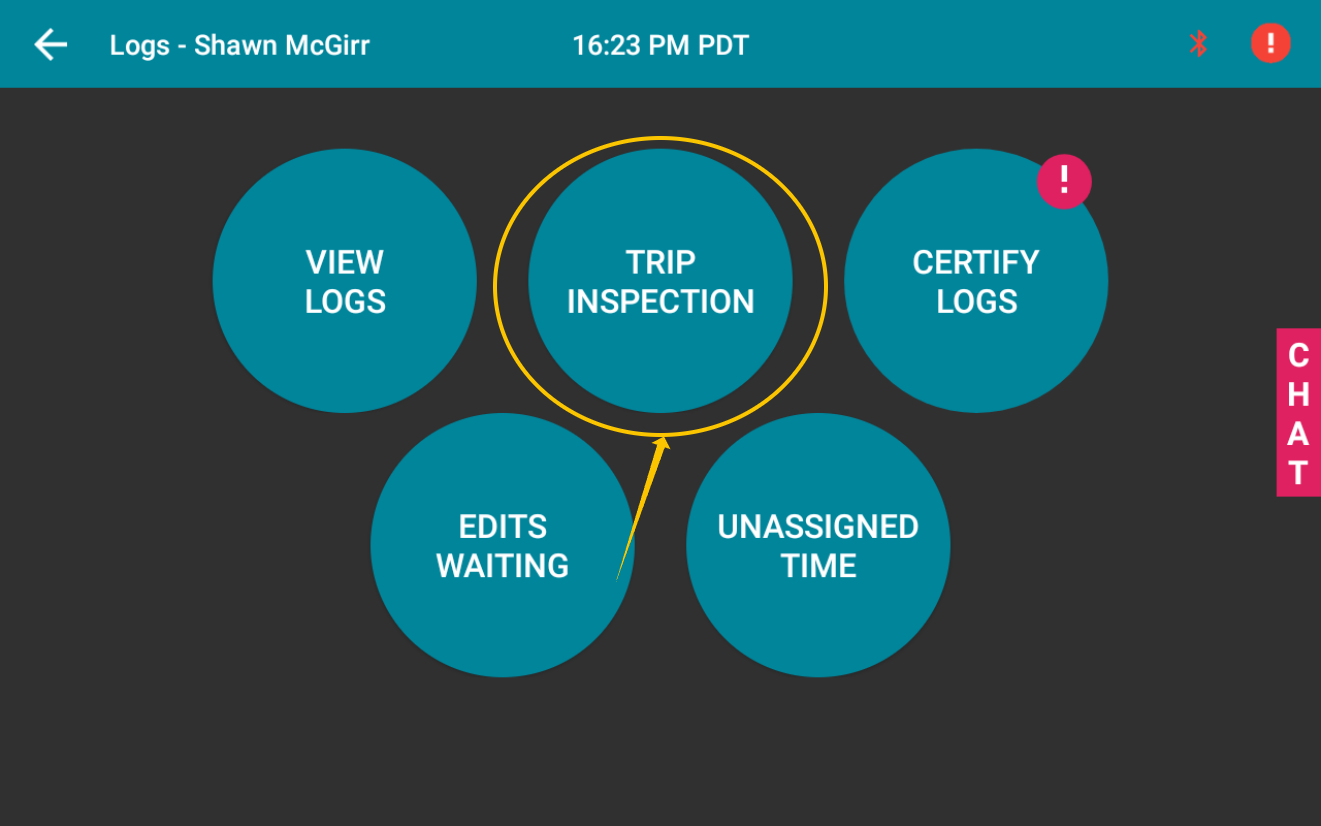
Start by selecting the Trip Inspection button:
****
From the **Trip Inspection** screen, you'll be able to see the various Trip Inspections that have been completed.
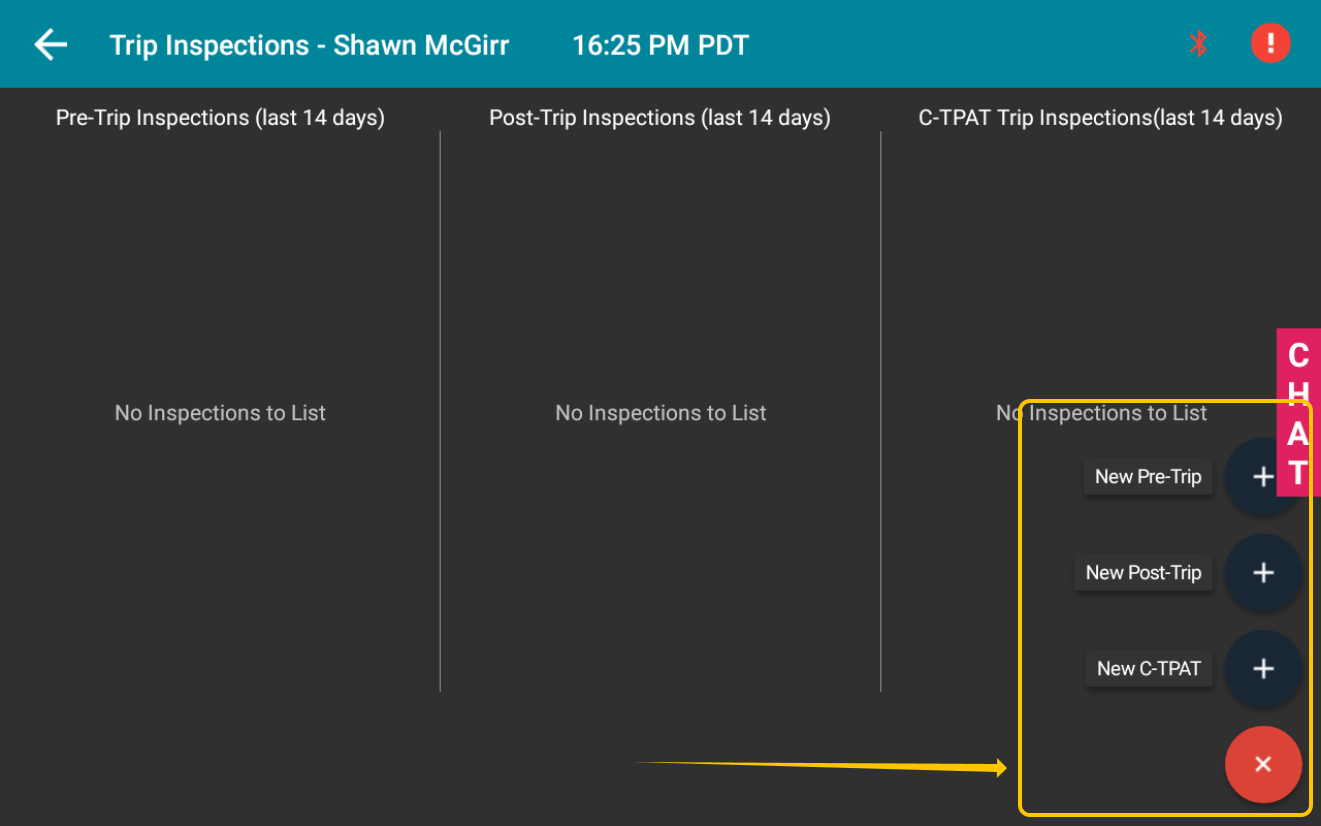
To fill out a Trip Inspection, select the red **+** button on the bottom right of the screen, and select either **New Pre-Trip** or **New Post-Trip** to create the new trip inspection.
### **Filling out a Trip Inspection**
From the Trip Inspection Screen, you can enter the following information:
- **Vehicle ID**: The number/ID of your vehicle. To set a new vehicle, log out, then log back in.
- **Trailer ID**: The number/ID of your trailer.
- **Odometer**: The odometer reading of your vehicle. The miles/km is usually automatically entered from your Switchboard Engine Module.
- **Location**: The location of your vehicle. The location is usually automatically entered from your **emdecs one** ELD Satellite GPS.
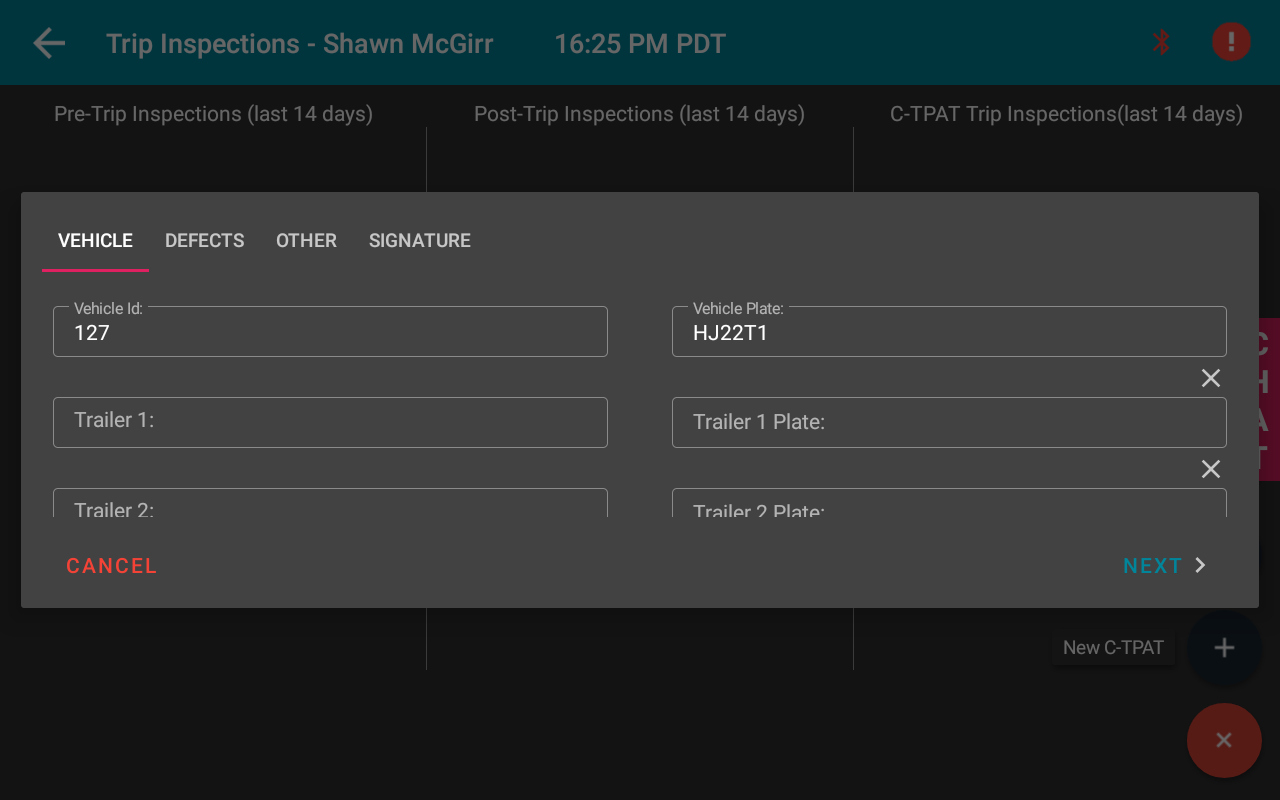
If you have any defects on your truck or trailer, tap **Add**. You will be able to enter a defect and any comments regarding that defect. Repeat this step as many times as necessary to cover all the defects you have found.
Once you are ready to complete the trip inspection, use the **SIGNATURE** choice to sign your trip inspection, then select **Finish.**
.
- [EMDECS](https://knowledge.brightorder.com/emdecs?hsLang=en#main-content)
- [Getting Started](https://knowledge.brightorder.com/emdecs?hsLang=en#getting-started)
- [How-To Guides](https://knowledge.brightorder.com/emdecs?hsLang=en#how-to-guides)
- [Troubleshooting](https://knowledge.brightorder.com/emdecs?hsLang=en#troubleshooting)
- [Account & User Management](https://knowledge.brightorder.com/emdecs?hsLang=en#account-user-management)
- [Integrations](https://knowledge.brightorder.com/emdecs?hsLang=en#integrations)
- [Release Notes](https://knowledge.brightorder.com/emdecs?hsLang=en#release-notes)
- [emdecs one](https://knowledge.brightorder.com/emdecs-one?hsLang=en#main-content)
- [Maintenance](https://knowledge.brightorder.com/emdecs-one?hsLang=en#maintenance)
- [emdecs one ELD](https://knowledge.brightorder.com/emdecs-one-eld?hsLang=en#main-content)
- [Troubleshooting](https://knowledge.brightorder.com/emdecs-one-eld?hsLang=en#troubleshooting)
- [How-To Guides](https://knowledge.brightorder.com/emdecs-one-eld?hsLang=en#how-to-guides)
- [Getting Started](https://knowledge.brightorder.com/emdecs-one-eld?hsLang=en#getting-started)
- [Account & User Management](https://knowledge.brightorder.com/emdecs-one-eld?hsLang=en#account-user-management)
- [Tracking](https://knowledge.brightorder.com/tracking?hsLang=en#main-content)
- [Getting Started](https://knowledge.brightorder.com/tracking?hsLang=en#getting-started)
- [Troubleshooting](https://knowledge.brightorder.com/tracking?hsLang=en#troubleshooting)
- [How-To Guides](https://knowledge.brightorder.com/tracking?hsLang=en#how-to-guides)
- [Account & User Management](https://knowledge.brightorder.com/tracking?hsLang=en#account-user-management)
- [Integrations](https://knowledge.brightorder.com/tracking?hsLang=en#integrations)
- [ELD](https://knowledge.brightorder.com/eld?hsLang=en#main-content)
- [Release Notes](https://knowledge.brightorder.com/eld?hsLang=en#release-notes)
- [Legacy Device Troubleshooting](https://knowledge.brightorder.com/eld?hsLang=en#legacy-device-troubleshooting)
- [How-To Guides (Legacy Devices)](https://knowledge.brightorder.com/eld?hsLang=en#how-to-guides-legacy-devices)
- [Dashcam](https://knowledge.brightorder.com/dashcam?hsLang=en#main-content)
- [How-To Guides](https://knowledge.brightorder.com/dashcam?hsLang=en#how-to-guides)
- [General](https://knowledge.brightorder.com/general?hsLang=en#main-content)
- [Contact Us](https://knowledge.brightorder.com/general?hsLang=en#contact-us)
- [Getting started](https://knowledge.brightorder.com/getting-started?hsLang=en)
[](https://knowledge.brightorder.com/?hsLang=en)
www.brightorder.com Help Center
[mailto:email@email.com](mailto:email@email.com)
Copyright © 2026, BrightOrder Inc.