
Who is this article for? Admin users who maintain fleets and records of customer assets, and any users who are allowed to create new assets.
While emdecs one tracks many types of category information about assets (such as owner, make and model, and asset class) you may have ways of organizing units and equipment that are not built-in to the application. In that case you can use the Groups functionality to create your own categories and subcategories to apply to your assets.
Creating Groups
If you have a user role which allows group creation, you will see an option named Groups in your company settings. Company settings is accessed by selecting the gear icon in the corner of any emdecs one screen.
Selecting the groups option will show you this screen, assuming that no-one else has created groups yet:
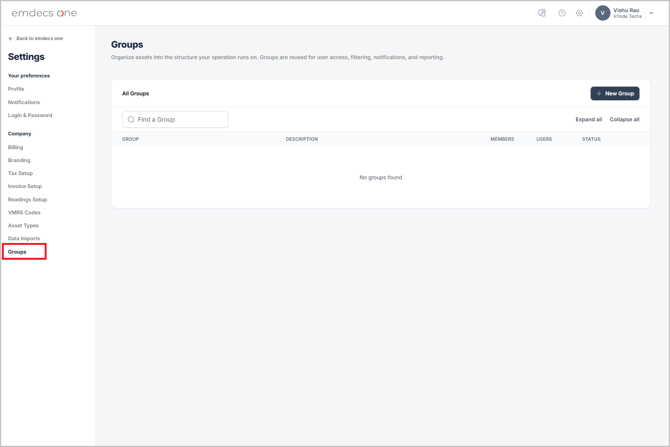
You can add groups to the list by clicking the New Group button to show this popup:
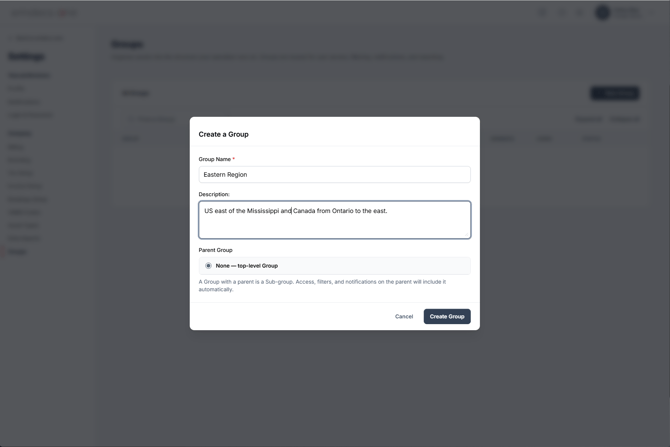
At a minimum you need to fill in a Group Name, and optionally you can fill in a longer description of the group if you think it would be helpful for other users looking to understand what the group represents.
If this is the first group you've created the one other option on this popup will be forced to None - Top Level Group. Soon you'll see an option to add child groups, which are explained below.
Creating a Child Group
Sometimes the groups you create can benefit by being broken down further. For example, in the screenshots above we created a group corresponding to the entire Eastern half of North America. We might then want to break the Eastern Region into smaller geographic areas. If we then want to see something related to the Eastern Region as a whole we can do that, but then we'll also be able to narrow down to, say, New England States when we need to.
Once the larger group has been created (in our example, Eastern Region) when we create another group we'll be given an option we didn't have before: the Parent Group section will show all top-level groups so that we can select one and slot our new group in as a sub-category of it. An example child group might look like this:
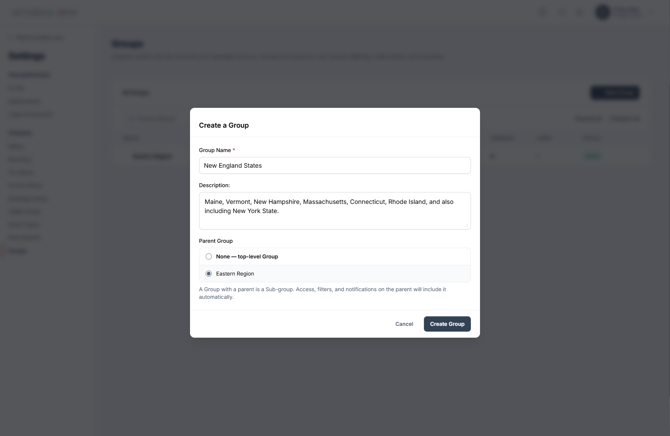
While there's nothing stopping us from making another top-level group that has nothing to do with the Eastern Region, in this case by selecting Parent Group - Eastern Region we've linked the two together with the Eastern Region group containing the New England States group.
You can have as many child groups in one parent group as you like. Continuing with our example we can create more children of the Eastern Region after saving our New England States group, presumably covering the rest of our subregions like so:
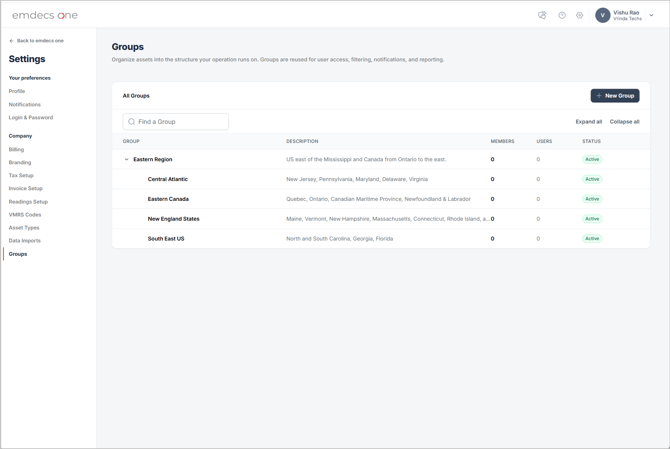
NOTE: You can also break down subgroups even further if you like, using the same steps as above. The only difference is in what you select as the parent. A subgroup can be a parent, which would then make your new "sub-sub-group" belong to both the top-level parent and the subgroup you select.
Adding Assets to a Group
There are two ways to put assets (a truck, trailer, or other equipment) into a group.
- An admin can add them to the group from the Groups screen after creating the group
- A user who is drilled in to the asset's details through the Assets screen can add that asset to a group.
The former is normally used for "mass adds" of assets that have already been created, while the latter method is usually for when a new asset is being added to emdecs one (e.g., when a customer brings a vehicle that's new to you into the shop for repairs).
Adding assets via the Groups screen
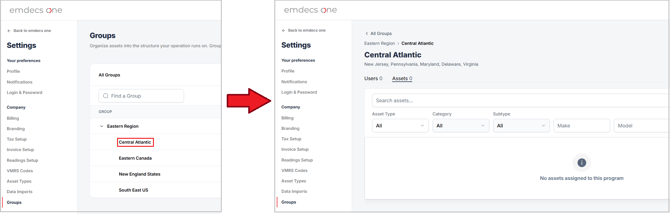
From the main Groups screen (accessible by clicking the gear icon in the upper part of any emdecs one screen, then selecting Groups from the Company settings menu), click on the name of the group you'd like to add assets to then select the Assets tab from the screen that emdecs one shows you:
This screen shows you the assets which are already assigned to the group, so click the Add Assets button to switch to that mode:
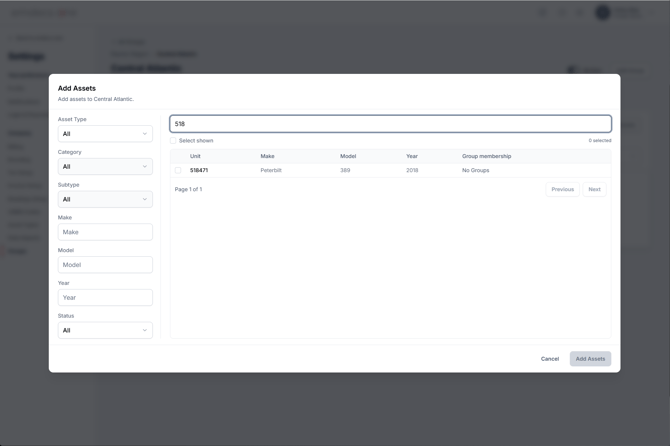
You can search for individual assets by Unit Number using the main search bar along the top of this popup. The application accepts both full and partial numbers and will show you assets in the system that match what you type. When you see the asset you want, click the checkbox next to the unit you want to add then click the Add Assets button.
NOTE: You can select more than one of the listed assets if you want, and assign them all with one click of the Add Assets button.
Alternatively you can use the selectors on the left side to specify the sort of unit you'd like to add to the group. As before, emdecs one will show you all of the assets which match what you enter, and you can then select one or more of them before clicking Add Assets.
NOTE: If there are many assets showing and you want to add all of them, the Select shown checkbox will select the whole list with one click.
If you want to, an asset can be assigned to more than one group. This happens automatically when you assign a subgroup—doing that also assigns the asset to its parent group. If you have groups that are completely unrelated, though (for example, geographic regions and groups related to general age like New Unit/One to Five Years Old/Older than Five Years), there's nothing stopping you from assigning the unit to one of each manually. Less commonly you can even manually assign an asset to two sub-groups of the same parent if doing so would be useful.
Adding Assets to a group using the Asset Details screen
Selecting Assets > Vehicles or Assets > Trailers from the emdecs one menus shows you a list of existing employees and a button for creating new ones.
- If you are creating a new asset and looking to add it to one or more groups at the same time, click the NEW ASSET button.
- If you are adding a group to an already existing vehicle/trailer then click the three-dots icon for that asset, which is shown in the Actions column. From the menu that shows, pick Details.
Both options 1 and 2 above will lead to the same screen, and the employees groups are managed with the panel highlighted here:
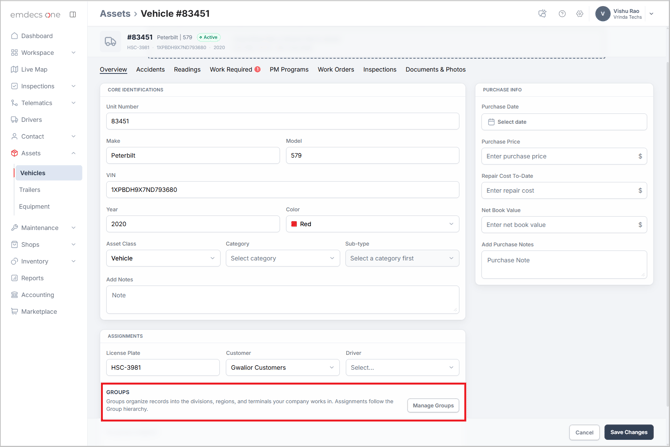
Click the Manage Groups button to show this popup:
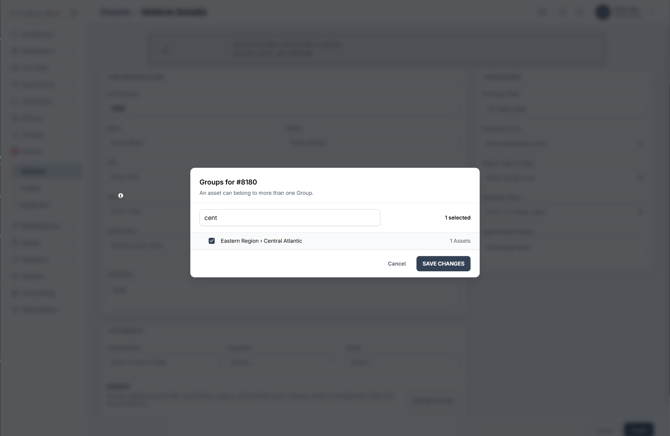
Using the search box to narrow things down if needed, select the checkbox next to each group that you want then click SAVE CHANGES. The asset will be assigned to those groups.
NOTE: You can also use this pop-up to unassign an asset from a group that it was put into previously. Those groups will already be selected/checked off and unchecking them before clicking SAVE CHANGES will remove it from those groups.
Adding Users/Employees to a Group
If you add a user to a group, that assignment works in combination with the assets that are added to that group. Whenever emdecs one shows a list of assets to that user (for example, when they select an asset while creating a new work order) only the units in that user's assigned group(s) are shown. A user can be in more than one group, if appropriate.
There are two ways to put users (your organization's employees) into a group.
- An admin can add them to the group from the Groups screen after creating the group.
- A user who is drilled in to the user's details through the Contact > Employees screen can add that user to a group.
The former is normally used for "mass adds" of users that have already been created, while the latter method is usually for when a new user is being added to emdecs one.
Adding users/employees via the Groups screen
From the main Groups screen (accessible by clicking the gear icon in the upper part of any emdecs one screen, then selecting Groups from the Company settings menu), click on the name of the group you'd like to add users to then select the Users tab from the screen that emdecs one shows you:
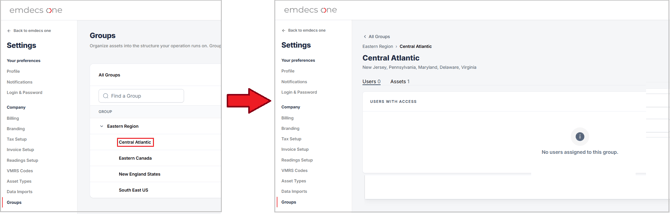
Click the Manage Users button here and you'll be shown the popup screen that lets you add users:
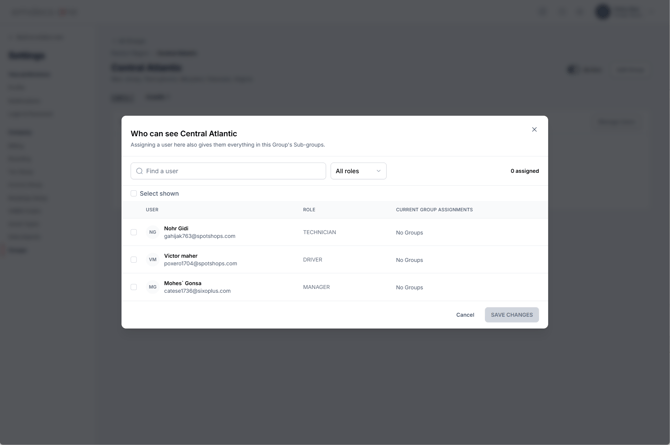
Type some or all of the name you're looking for into the Find a User box and emdecs one will show you a list of everyone in the system who matches (inactive users will be excluded). Optionally, you can also narrow things down by employee role such as Technician or Driver using the dropdown next to the search box.
Once a list is being shown you can click the checkbox next to any name, as many of them as you like, then click the SAVE CHANGES button to add them to your group.
Adding users/employees to a group through the Employee screen
Selecting Contacts > Employees from the emdecs one menus shows you a list of existing employees and a button for creating new ones.
- If you are creating a new asset and looking to add it to one or more groups at the same time, click the NEW EMPLOYEE button.
- If you are adding a group to an already existing employee then click the three-dots icon for that user, which is shown in the Actions column. From the menu that shows, pick Details.
Both options 1 and 2 above will lead to the same screen, and the employee's groups are managed with the panel highlighted here:
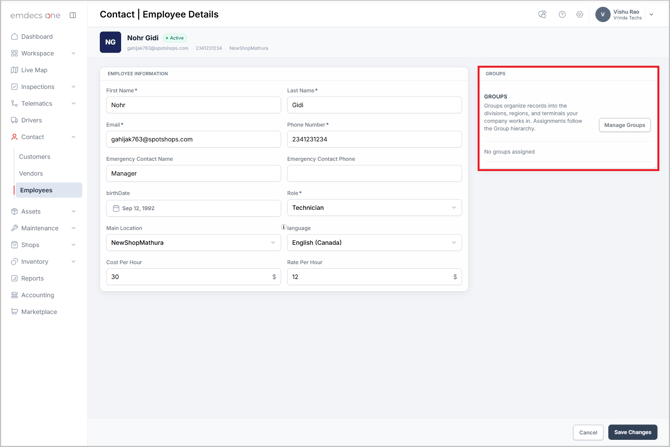
Clicking the Manage Groups button will show you a list of all groups and allow you select all of the applicable groups. If necessary, use the search box at the top of the popup which is shown to type some or all of the name of the group you're looking for:
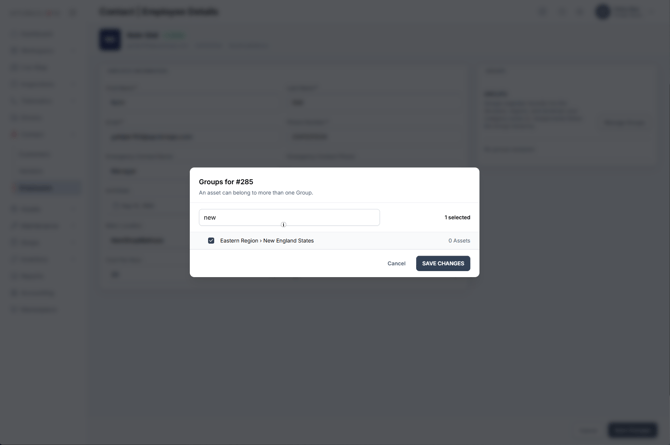
Once you've selected the group(s) you want, click the SAVE CHANGES button and the employee will be assigned to them.
NOTE: You can also use this pop-up to unassign someone from a group they were put into previously. Those groups will already be selected/checked off and unchecking them before clicking SAVE CHANGES will remove them from those groups.