
Who is this article for? Super Admins using emdecs one's web client.
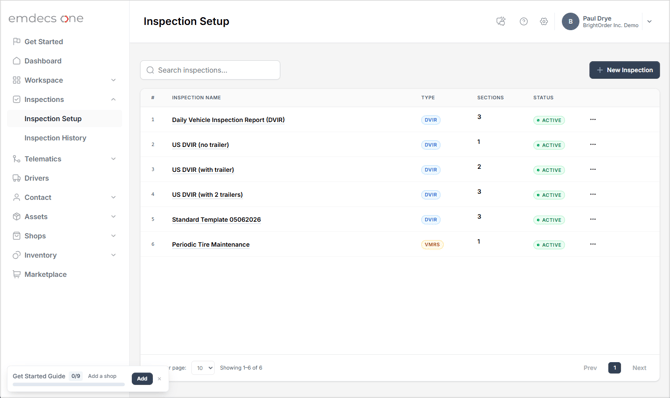
Begin by selecting the Inspections> Inspection Setup choice from the left-hand menu bar. This will show the inspection setup's main screen. It will display a list of all inspection forms that have already been created:
Clicking the New Inspection button will display a popup for you to fill in and the new inspection form's basic information:
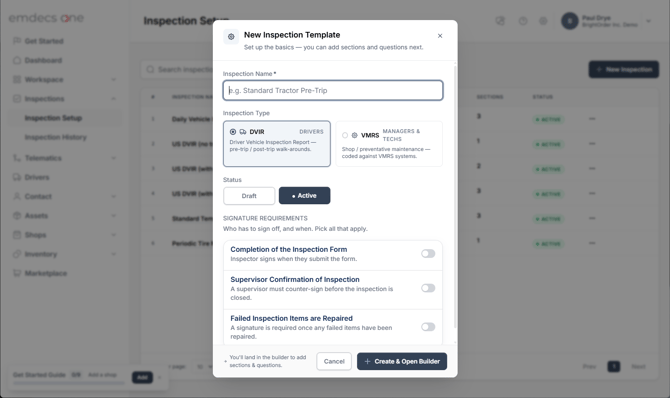
Inspection Name and Type
The first thing you should do is give your inspection a name, for example PM J Annual Inspection (Peterbilt) or Periodic Tire Maintenance.
Once you've settled on a name, you'll need to then need to tell emdecs one that this inspection form is for technicians by clicking the VMRS inspection type. This sets the form so that it has a few particular characteristics:
-
The inspection will have a VMRS code associated with it, and this code and description will be added to a work order as a chargeable item when the inspection is done. In general, this is an inspection which is performed by a technician, on a work order where other work not related to the inspection may also be done.
-
Inspection item failures will also have VMRS codes associated with them automatically to speed up adding them to a work order when they are repaired, but the technician doing that work will still have the option of changing that code if they find the problem is actually different from the one that was assumed when the inspection was performed.
Signature Requirements
While not mandatory in emdecs one, you do have the option of setting signature requirements based on your company's policies or for legislative reasons (e.g., if it's the law that a technician must sign a particular inspection mandated by the government). You can have one, two, or even three points at which the inspection is signed:
- On completion of the inspection, by the tech who completed it
- On completion of the inspection, by relevant tech's supervisor
- When the work order containing the inspection failure repairs is closed/invoiced. Note that it's possible for this work to be spread across more than one work order, so this signature will only be obtained when the all failures are repaired.
Once you've filled in all of the options you want for name, type, and signature requirements, click the Create & Open Builder button. This will take you to a blank inspection form where you'll build your inspection:
.png?width=670&height=399&name=Inspection%20Setup%20Details%20(blank).png)
The first thing you'll need to do is click the Add Section button at the lower left. emdecs one assumes that your inspection form is broken up into sections, with each section focusing on a particular area of the truck that is being inspected (for example, you might have one section for Brakes, one section for Tires, and one section for the Roll-Up Door, among others). You do need to have a minimum of one section, though if you choose to go that route you can just give it a generic name like Inspection.
When you click Add Section, a new section named (for now) Section 1 will be added to the Sections portion of the screen. Clicking on that will then like you start adding questions to it like so:
.png?width=670&height=398&name=Inspection%20Setup%20Details%20(section%20added%20and%20selected).png)
If you want to edit the section name into something more specific, click the pencil icon next to the section's name on the left. If you change you mind about adding a section, the red trash can icon will delete it.
The core action here is adding questions/inspection items to the section. Click the Add Question button to see this:
.png?width=670&height=399&name=Inspection%20Setup%20Details%20(question%20added%20to%20selection).png)
There's two things that you'll probably want to do to this generic question/inspection item that's been added. Clearly, one is the description—you'll want to change that from New Question 1 to something that describes the inspection item for the technician (for example Check Left Front Tire Pressure). Less obviously, you'll often want to change what's expected to be filled in by your technician. emdecs one assumes it's a simple Pass/Fail, but there are other options.
To change one or both of these, click drop-down arrow at the far right of the inspection item:

Doing this expands the details of that question:
.png?width=670&height=254&name=Inspection%20item%20drop%20down%20(expanded).png)
The text of the inspection item that's shown to the inspecting technician will be whatever you put into the Question Text field.
However, the Answer Type needs some explanation. If you click it, you'll see these options, which change what the technician will be filling in and how emdecs one will determine if the inspection item passed or failed:
- Pass/Fail: The simplest option, this leaves it up to the technician to decide if it passed or failed. Unless they fill in some notes to go along with it, there will be no record of why it passed or failed.
- Text: This kind of inspection item can never fail. The technician is expected to just fill in some text, usually a description of what they found when doing that inspection item. It's a good idea to put a short explanation of what you're expecting them to type in the question text if you pick this Answer Type.
- Number: This also cannot fail. The technician is expected to fill in a number and that's all. An example might be an odometer reading. There's no such thing as a "failed" odometer reading, so setting its inspection item to the Number type is a way of making it so that the reading is recorded but can't ever require a repair.
- Above Minimum: You'll supply a number that is the bare minimum which is acceptable. The technician will then supply a number of his own and emdecs one will figure out if that's a pass or fail for them. For example, if you make an inspection item called Check Left Front Tire Pressure and make it an above minimum Answer Type, you'd be able to set what you think is the lowest acceptable value. If you were to set it to 85, then if the technician later enters that the pressure on this asset's tire is 94 it will pass. But if the pressure is only 79, it will fail.
- Below Maximum: This setting is very like the Above Minimum type, with the difference being that you set the maximum acceptable value. Suppose that the maximum you set was 100. If the tech entered 91 later, it fails. If they enter 104, it passes.
- Min/Max Range: This combines the two previous types. There's both a minimum and a maximum. This is actually the likeliest one to use with our previous example, tire pressure: if the pressure is too low, that's a problem, while if it's too high that may be a different kind of problem but it's still an issue. So you could select Min/Max Range and set the range from 85 to 95. If you do this, only if the technician reports a tire pressure between 85 and 95 (inclusive) will the inspection item pass. If it's under 85 or over 95, it fails.
- Date: A specialized version of the Number field. The tech is expected to enter a date (for example, the expiry date of a vehicle registration plate). This also cannot fail.
Required and N/A
There are two more, optional choices in the details of a question.
Required: Any question added to an inspection is assumed to be required. It must be answered by the technician before the inspection can be marked as Done. If you want to, though, you can make an inspection item Not Required. In this case, if the tech skips over this inspection item for whatever reason, emdecs one won't insist that they fill it in before finishing.
N/A: You turn this on for a question that might not apply to every asset undergoing this inspection. For example, suppose your fleet has 20 trucks. Eighteen of them are regular cargo vans but two of them are temperature-controlled because they transport food that needs refrigeration. While you might make two separate inspection forms, one for each type of van, you could also just make one and use the N/A functionality. Any inspection item that relates to the temperature and temperature controls of a vehicle would be set to Allow N/A, so that when inspecting your 18 regular trucks the tech can just mark them as N/A. It's neither a pass or a fail, the inspection item literally makes no sense for these units so they can be skipped. On the other hand, if it's a unit where the inspection item does make sense, the usual options for Pass/Fail are also available.
If you stop and think about it, you could use Not Required as a way of dealing with this situation too, so what's the difference? Make your decision on this basis:
- N/A Allowed: This is for inspection items where you want to make sure that the technician actually stopped to check if the item was appropriate for the unit or not. If they decide it's not they still have to check off N/A, so you know they took a moment to at least think about it.
- Not Required: Having to check off N/A does take a second, so if you're OK with taking the risk that the tech didn't answer an inspection item because they skipped it by accident even though they should have filled it in, then you can go this way and save some time. Be aware that many government-mandated inspections do require the tech to explicitly acknowledge that the don't have to do this inspection item (in other words, mark it as N/A) so using Not Required in this situation is not ideal.
Continuing with your Inspection Form
Once you've added one question to the current section, continue using the Add Question button as many times as needed to add all the inspection item's you'd like to this section.
When the section is completed, you then have the option of using the Add Section button again and then adding questions to it.
Repeat these two steps until you have all the inspection items you need in your form.
Saving Your Inspection Form
Once all the sections are added and they have all their questions entered, you'll need to save your work. To do this, click the Save Template button.