
Spot Order
This article will provide an overview of the Order Parts menu in EMDECS.
Video Walkthrough
1. Open the Parts menu and click on Order Parts.
2. The Order Parts menu opens up to the Spot Order tab. This is one way to create a purchase order by inputting the parts to order first.
At the top of the screen, you can search for the Part Number.
3. Then adjust the Quantity and click Add. This will add the parts to the right side of the screen. Continue this process until you've added all parts that you want to order. If you have multiple warehouses, ensure that the correct Warehouse is selected from the drop-down list.
4. Once you've added all the parts click Issue PO. If the parts already have Default Preferred Vendors, they will show up automatically in this screen, or you can select/change the Vendor name from the drop down. Click Issue PO next to the Vendor Name to open the PO screen.
To add a Default Preferred Vendor for a Part # go to Parts > Part Master > Drill down into Part # Settings Tab > Click on Select hyperlink
5. In the top pane of the Purchase Order screen, this is where general information of the PO is located, such as Location, Vendor, PO #, Reference, PO Date, etc. You can adjust any of the necessary fields using the text fields or hyperlinks.
6. In the middle of the screen, you can add additional parts, remove parts, and adjust the Order Quantity, and Unit Cost.
Use the Part # field to search for your part and select it from the drop down list. Adjust the Quantity and click the Add Part button to add it to your PO.
7. You also have the option to link a part number from the PO to a Repair Order Activity or a Counter Sale. Click on the Link button beside the part number.
Then you can select the RO Number and the VMRS you want to link the part to. Click on the Counter Sale radio button to link the part to an existing Counter Sale in EMDECS.
8. In the top right, there is a summary of charges. This is where you can view the total charges and make any modifications to Added Cost and Taxes.
9. To add an Added Cost, click on the hyperlink. In the pop-up click on the green + to add the additional cost. Use the Amount field to input the added cost amount. Then check the Taxable or Include in Invoice checkboxes if necessary. Repeat these steps for all Added Costs then click Save/Exit.
10. To adjust taxes on the PO click on the hyperlink beside Taxes. In the pop-up click pn the green + to add new taxes or use the Overide checkbox to change the exisitng tax amounts.
11. Once you are finished modifying the PO and you are ready to submit it, click on the Submit/Print PO button. This will open up a PDF of the PO that you can print to submit to the vendor or you can email it to the vendor as well.
12. Here is an example of the Purchase Order PDF printout.
Order from Vendor
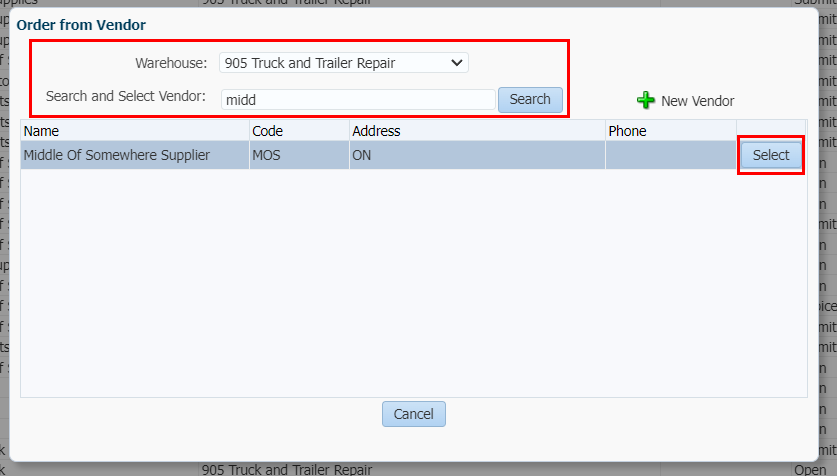
1. Another way to submit and create a PO is Order from Vendor. You can find this option under the Things To Do menu there is a hyperlink that says Order from Vendor.
2. In the pop-up you are prompted to choose the Warehouse and Vendor. Once you've found the Vendor click on the Select button.
3. The same Purchase Order screen we saw before will pop-up. But this time the vendor is chosen first and the parts are added after.
3. The same Purchase Order screen we saw before will pop-up. But this time the vendor is chosen first and the parts are added after.
4. In the top pane of the Purchase Order screen, this is where general information of the PO is located, such as Location, Vendor, PO #, Reference, PO Date, etc. You can adjust any of the necessary fields using the text fields or hyperlinks.
5. In the middle of the screen, you can add additional parts, remove parts, and adjust the Order Quantity, and Unit Cost.
Use the Part # field to search for your part and select it from the drop down list. Adjust the Quantity and click the Add Part button to add it to your PO.
6. You also have the option to link a part number from the PO to a Repair Order Activity or a Counter Sale. Click on the Link button beside the part number.
Then you can select the RO Number and the VMRS you want to link the part to. Click on the Counter Sale radio button to link the part to an existing Counter Sale in EMDECS.
7. In the top right, there is a summary of charges. This is where you can view the total charges and make any modifications to Added Cost and Taxes.
8. To add an Added Cost, click on the hyperlink. In the pop-up click on the green + to add the additional cost. Use the Amount field to input the added cost amount. Then check the Taxable or Include in Invoice checkboxes if necessary. Repeat these steps for all Added Costs then click Save/Exit.
9. To adjust taxes on the PO click on the hyperlink beside Taxes. In the pop-up click pn the green + to add new taxes or use the Overide checkbox to change the exisitng tax amounts.
10. Once you are finished modifying the PO and you are ready to submit it, click on the Submit/Print PO button. This will open up a PDF of the PO that you can print to submit to the vendor or you can email it to the vendor as well.
11. Here is an example of the Purchase Order PDF printout.
WIP POs (Work in Progress Purchase Orders)
1. To view any Open, Submitted, or Invoiced POs, go to the WIP POs tab. Use the Warehouse dropdown to view POs corresponding to the chosen Warehouse.
2. If a PO is in an Open status, you can Copy, Void, or Submit/Print the PO.
3. If a PO is in the Submitted status you can Re-Open, Copy, Close, Print or Receive the PO.
Order History
1. To view PO Order History, go to the Order History tab. You have a few filters such as Warehouse, Status, Part #, Vendor and Date that you can use to search for a specific PO.
2. On the right hand side there is a PO Summary. Below that is any Receiving Info related to the selected PO.
3. Click on the PO # hyperlinks to open up the purchase orders and view additional PO information and actions.